Turkey gravy isn't merely a condiment; it’s the crowning glory of many cherished meals. It elevates a dish, adds depth, and turns a simple plate into a haven of flavors. So, what can you serve with turkey gravy? Think beyond turkey! Here are a few delicious options:
1. Mashed Potatoes Creamy, buttery mashed potatoes form a perfect bed for rich turkey gravy. The smooth texture of potatoes absorbs the gravy beautifully, creating a comforting bite.
2. Biscuits or Rolls Fluffy biscuits or soft rolls invite you to slather on the gravy. Each morsel becomes a delicious canvas, ideal for soaking up the savory goodness.
3. Roasted Vegetables Roasted veggies, such as carrots, brussels sprouts, and squash, add a delightful contrast. The sweetness of the veggies complements the saltiness of the gravy, creating a balanced dish.
With these pairings prepped in the wings, let’s dive into the world of turkey gravy!
There’s magic in the kitchen when Thanksgiving rolls around. Families gather, laughter fills the air, and the scent of roasted turkey wafts through the home. But there’s one thing that everyone anticipates almost as much as the turkey itself: the gravy!
My journey with turkey gravy began years ago when I tried to recreate my grandmother's recipe. It was an adventure filled with sweet nostalgia and a few kitchen mishaps. Over the years, I've perfected this simple, delightful dish, and I can't wait to share it with you.
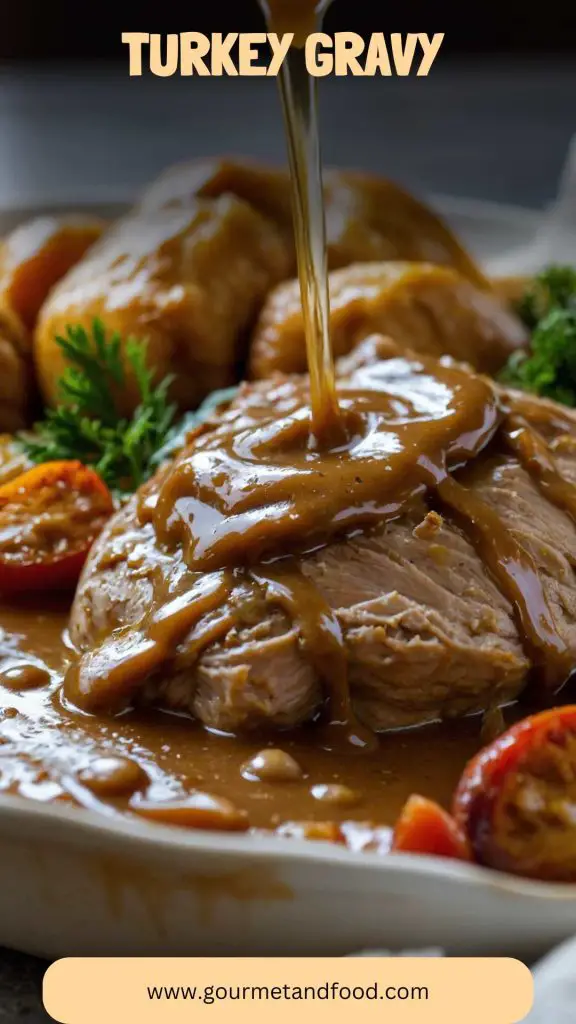
Turkey gravy is a savory sauce made from the pan drippings of a roasted turkey. It often incorporates broth, flour for thickening, and seasonings. The flavor is rich, deeply satisfying, and connects all elements of a festive meal, from the turkey to the mashed potatoes.
Why This Recipe Works
This turkey gravy recipe holds a special place in my heart, and here’s why:
1. Using Pan Drippings Enhances Flavor Utilizing those tasty drippings ensures that every drop of gravy bursts with flavor. It's where the turkey's essence meets a velvety texture that celebrates the bird.
2. Quick and Easy You don’t need to spend hours slaving away in the kitchen. With just a few simple ingredients and steps, you'll have a fantastic gravy ready to go in a matter of minutes.
3. Customizable Seasoning Feel free to tweak the flavors to match your taste. Adding herbs or spices can create a unique twist that suits your culinary preferences.
4. Low-Sodium Options Available By opting for low-sodium broth, you can enjoy a rich-tasting gravy without the excessive salt. It’s a healthier option without sacrificing flavor.
Ingredients You’ll Need to Make This Dish
Gather these essential ingredients for the best turkey gravy:
4 cups low-sodium chicken stock or broth This forms the base of your gravy. You can use homemade or store-bought, but aim for low-sodium.
6 tablespoons all-purpose flour This thickens the gravy and gives it a delightful body.
1 teaspoon fresh thyme leaves (or ½ teaspoon dried thyme) Thyme adds a subtle earthiness to the flavor profile.
Salt and freshly ground black pepper, to taste These are essential for seasoning; they elevate the overall taste.
1 teaspoon soy sauce This introduces an umami kick and deepens the flavor.
6 tablespoons turkey pan drippings The star of the show! These drippings should be rich and flavorful from your roasted turkey.
How to Make Turkey Gravy
Let’s get cooking! Here’s a step-by-step guide to crafting the perfect turkey gravy.
Step 1: Collect the Drippings
After taking the turkey out of the oven, allow it to rest for about 15-20 minutes. This resting period allows the juices to redistribute. Make sure to collect those savory pan drippings from the roasting pan. Pour them into a small bowl and let the fat rise to the top before skimming it off, leaving you with the flavorful liquid beneath.
Step 2: Prepare the Roux
In a medium saucepan, heat 4 tablespoons of the skimmed drippings over medium heat. Once hot, sprinkle in the flour. Whisk continuously for 2-3 minutes until the mixture is golden-brown, forming a roux. This step is crucial for creating a thick, lump-free gravy.
Step 3: Gradually Add Stock
Slowly pour in the chicken stock while continually whisking to prevent lumps. The goal is to combine the roux and stock seamlessly. As you whisk, the mixture will begin to thicken.
Step 4: Season and Simmer
Add your thyme, soy sauce, and a pinch of salt and pepper. Bring the mixture to a gentle simmer. Allow it to cook for an additional 5-10 minutes, stirring frequently, until the gravy reaches your desired consistency.
Step 5: Taste and Adjust
Once the gravy is thickened, taste it. Adjust the seasoning if necessary, adding more salt, pepper, or herbs according to your preference. A final touch could be a splash more drippings, adding a bit more depth.
Step 6: Serve Hot
Serve the gravy warm over your turkey and sides. It’s the perfect finishing touch for your holiday feast!
Tips & Tricks
To ensure your turkey gravy is a hit, consider these tips:
Use Fresh Ingredients: Fresh herbs and quality broth enhance flavor significantly.
Blend it Up: If you have any unwanted lumps, you can always blend the gravy in a blender until smooth.
Adjust Consistency: If the gravy is too thick, thin it out with a bit more broth. If it's too thin, simmer longer to reduce it.
Make Ahead: You can make the base of the gravy ahead of time and simply reheat on Thanksgiving.
Store Wisely: Save any leftover gravy in airtight containers. It can last in the fridge for about 3-4 days.
Nutrition Information
Here’s the breakdown of the nutrition in a typical serving of turkey gravy (about ¼ cup):
This will vary based on how much fat you include and the broth you select.
How Do You Store the Leftovers?
Storing leftover turkey gravy is simple. Follow these steps:
1. Cool Down: Allow the gravy to cool to room temperature.
2. Use Airtight Containers: Transfer the gravy into airtight containers or freezer bags.
3. Refrigerate or Freeze: Gravy can be stored in the refrigerator for up to four days. For longer storage, freeze it, where it can last for about three months.
4. Thaw and Reheat: When you're ready to enjoy it again, thaw it overnight in the fridge. Reheat gently on the stove, adding a splash of broth if it appears too thick.
What Sides Would Complement Turkey Gravy?
Let’s talk sides. They can elevate your turkey gravy experience to new heights!
1. Creamy Mashed Potatoes Smooth, rich, and perfectly buttery, mashed potatoes allow the gravy to shine. With each spoonful, it’s a match made in culinary heaven.
2. Dressing or Stuffing Savory stuffing, filled with herbs and spices, pairs well with gravy. When combined, they create a soulful bite that brings warmth and comfort with every forkful.
3. Green Bean Casserole This traditional side offers a creamy, crunchy contrast to the gravy. The earthiness of the green beans enhanced with gravy creates a well-rounded combination.
What Alternatives Can You Use for the Ingredients if They Are Not Present in Your Kitchen?
Let’s be realistic. Sometimes we can’t find everything we need. Here are some alternatives:
1. Chicken Broth If you’re out of low-sodium chicken broth, vegetable broth works well too. It will create a slightly different flavor but will keep the gravy delicious.
2. Flour For a gluten-free option, use cornstarch or arrowroot powder. Mix it with water to create a slurry before incorporating it into the gravy base.
3. Thyme If fresh or dried thyme isn’t on hand, feel free to use other herbs like rosemary or sage. They will add a different yet enjoyable flavor dimension.
4. Soy Sauce If you prefer to skip soy sauce for health reasons, consider using Worcestershire sauce for a similar depth and umami flavor.
Conclusion
Turkey gravy is a cherished staple that transforms a meal into a memorable occasion. It brings warmth, flavor, and heart to the table, reminding us of family gatherings and shared moments. In crafting your own turkey gravy, you’re not just following a recipe; you’re partaking in a timeless tradition.
Feel free to adapt this recipe, play with flavors, and make it your own. Let it be a source of pride at your holiday gatherings. Now go ahead, create this masterpiece, and watch the smiles light up as you serve this masterpiece at your table. Happy cooking!
There’s magic in the kitchen when Thanksgiving rolls around. Families gather, laughter fills the air, and the scent of roasted turkey wafts through the home. But there’s one thing that everyone anticipates almost as much as the turkey itself: the gravy!
My journey with turkey gravy began years ago when I tried to recreate my grandmother's recipe. It was an adventure filled with sweet nostalgia and a few kitchen mishaps. Over the years, I've perfected this simple, delightful dish, and I can't wait to share it with you.
Ingredients
4cups low-sodium chicken stock or broth
This forms the base of your gravy. You can use homemade or store-bought, but aim for low-sodium.
6tablespoons all-purpose flour
This thickens the gravy and gives it a delightful body.
1teaspoon fresh thyme leaves (or ½ teaspoon dried thyme)
Thyme adds a subtle earthiness to the flavor profile.
Salt and freshly ground black pepper, to taste
These are essential for seasoning; they elevate the overall taste.
1teaspoon soy sauce
This introduces an umami kick and deepens the flavor.
6tablespoons turkey pan drippings
The star of the show! These drippings should be rich and flavorful from your roasted turkey.
Instructions
1
Let’s get cooking! Here’s a step-by-step guide to crafting the perfect turkey gravy.
Step 1: Collect the Drippings
2
After taking the turkey out of the oven, allow it to rest for about 15-20 minutes. This resting period allows the juices to redistribute. Make sure to collect those savory pan drippings from the roasting pan. Pour them into a small bowl and let the fat rise to the top before skimming it off, leaving you with the flavorful liquid beneath.
Step 2: Prepare the Roux
3
In a medium saucepan, heat 4 tablespoons of the skimmed drippings over medium heat. Once hot, sprinkle in the flour. Whisk continuously for 2-3 minutes until the mixture is golden-brown, forming a roux. This step is crucial for creating a thick, lump-free gravy.
Step 3: Gradually Add Stock
4
Slowly pour in the chicken stock while continually whisking to prevent lumps. The goal is to combine the roux and stock seamlessly. As you whisk, the mixture will begin to thicken.
Step 4: Season and Simmer
5
Add your thyme, soy sauce, and a pinch of salt and pepper. Bring the mixture to a gentle simmer. Allow it to cook for an additional 5-10 minutes, stirring frequently, until the gravy reaches your desired consistency.
Step 5: Taste and Adjust
6
Once the gravy is thickened, taste it. Adjust the seasoning if necessary, adding more salt, pepper, or herbs according to your preference. A final touch could be a splash more drippings, adding a bit more depth.
Step 6: Serve Hot
7
Serve the gravy warm over your turkey and sides. It’s the perfect finishing touch for your holiday feast!
Nutrition Facts
Servings 4
Amount Per Serving
Calories50kcal
% Daily Value *
Total Fat3g5%
Saturated Fat1g5%
Cholesterol3mg1%
Sodium150mg7%
Total Carbohydrate6g2%
Protein1g2%
* Percent Daily Values are based on a 2,000 calorie diet. Your daily value may be higher or lower depending on your calorie needs.
Note
To ensure your turkey gravy is a hit, consider these tips:
Use Fresh Ingredients: Fresh herbs and quality broth enhance flavor significantly.
Blend it Up: If you have any unwanted lumps, you can always blend the gravy in a blender until smooth.
Adjust Consistency: If the gravy is too thick, thin it out with a bit more broth. If it's too thin, simmer longer to reduce it.
Make Ahead: You can make the base of the gravy ahead of time and simply reheat on Thanksgiving.
Store Wisely: Save any leftover gravy in airtight containers. It can last in the fridge for about 3-4 days.
Keywords:
Turkey Gravy
Maria George
Registered Dietitian & Cookbook Author
Maria George is a cookbook author and registered dietitian, passionate about merging gourmet cuisine with nutrition through her blog Gourmet And Food. Based in Illinois, she draws on her rich culinary background to create elegant, approachable recipes that celebrate quality ingredients and creativity in the kitchen. Maria’s goal is to inspire food lovers of all levels to explore gourmet cooking and enjoy the art of dining.