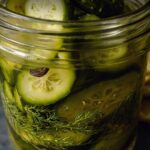
Sweet Dill Pickles - Gourmet And Food
Growing up, my family always had a jar of sweet dill pickles sitting on the kitchen counter. The crunchy little slices were a staple during gatherings. They were never just condiments; they were little bursts of happiness, providing a perfect crunch alongside sandwiches or served as a delightful addition to cheese platters. They turned every summer barbecue into a festival of flavor.
So, what exactly are sweet dill pickles? In this post, I will share their essentials and tell you how to whip up a great batch at home. Get ready, because today, we’re diving deep into the delightful world of sweet dill pickles!
Servings 64
Calories 55kcal
Ingredients
- ½ teaspoon garlic powder
- 2 teaspoons mustard seeds
- ½ cup apple cider vinegar
- 4 cups granulated white sugar, divided
- ½ cup filtered water
Instructions
Step 1: Gather Your Ingredients
- First things first, gather all your ingredients. Measure out the apple cider vinegar, sugar, mustard seeds, and garlic powder. Make sure your pickles are drained and sliced, ready to go. A little organization goes a long way in the kitchen.
Step 2: Create the Brine
- In a large bowl, combine the apple cider vinegar, filtered water, and 2 cups of granulated sugar. Whisk these ingredients until the sugar dissolves completely. Remember, this step is crucial. The brine is where the magic happens, so ensure that sugar is fully incorporated.
Step 3: Add Mustard Seeds and Garlic Powder
- Now, sprinkle in the mustard seeds and garlic powder. Give it another stir. The mustard seeds will infuse a subtle layer of flavor that’s not just sweet, but has a little kick! Let it sit for a few minutes to adjust those flavors and let the spices bloom.
Step 4: Incorporate the Pickles
- Carefully add the sliced dill pickles into the brine mixture. Use a spatula or large spoon to gently fold them in without breaking them apart. You want them to have that signature crunchy texture. Make sure they are well-coated with the brine.
Step 5: Pack into Jars
- Now, it’s time to pack it all into jars. Choose your favorite glass jars (make sure they’re clean!) and carefully scoop in the pickles along with the brine. Fill each jar to the top, ensuring the pickles are immersed. Seal them tightly with lids.
Step 6: Chill and Wait
- Pop those jars into the refrigerator. Now comes the hard part—waiting! Allow the pickles to marinate for at least 24 hours. But if you can hold out, a couple of days will result in even better flavor. That’s when they really soak up the brine and develop that irresistible flavor profile.
Notes
- Pick Your Pickles Wisely: Use fresh, crunchy pickles. The better the quality, the crunchier the finished product.
- Slicing Matters: For the best texture, slice evenly. Whether you prefer spears or slices depends on personal preference, but consistency is key.
- Taste Your Brine: Feel free to adjust sugar or vinegar to match your taste. It’s your recipe; play around!
- Spice It Up: Want a spicy kick? Toss in red pepper flakes or a sliced jalapeño in the brining process.
- Preservation: If making a large batch, consider canning techniques. You can extend the shelf life, but ensure you follow safe canning practices.